Renovation Specification · Sightline
Kitchen
16′ × 20′ · July 18, 2026
The Design
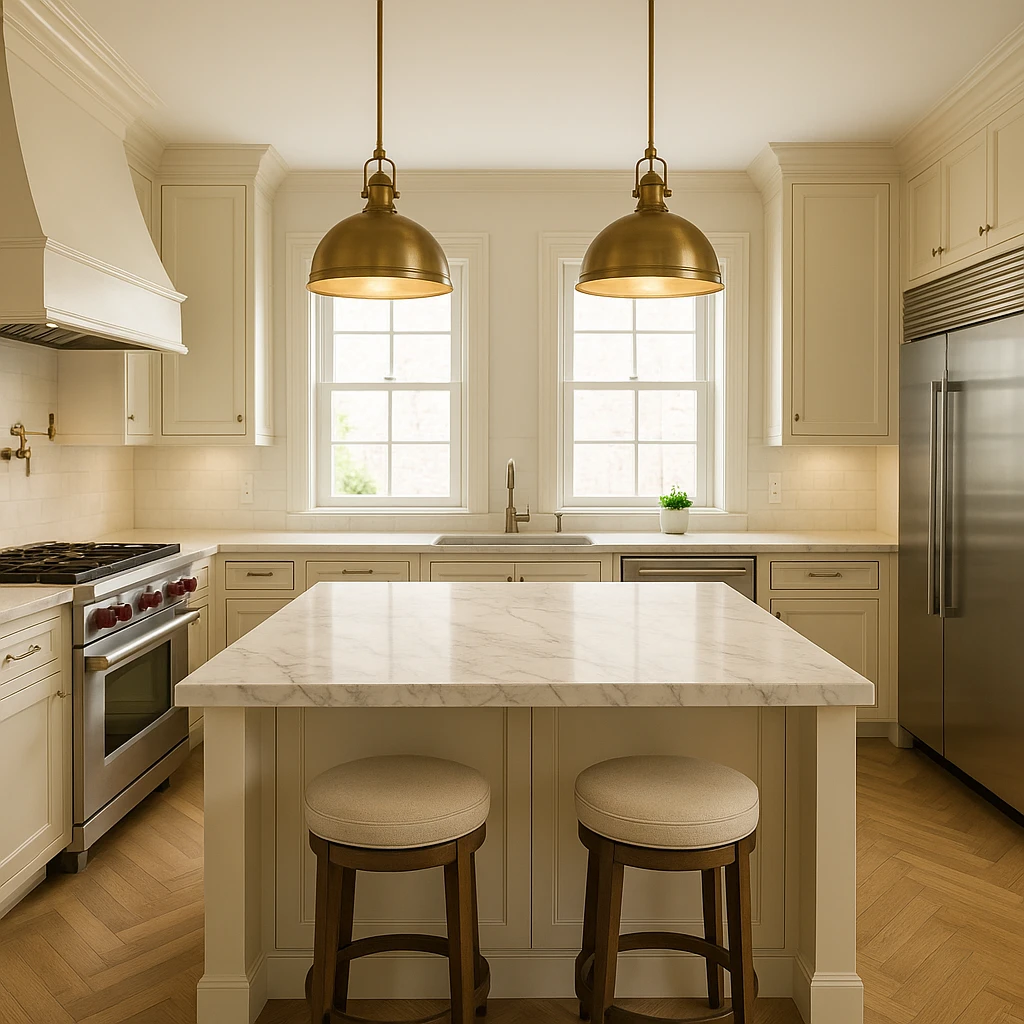
Luxurious chef's kitchen with Calacatta marble island
This stunning chef's kitchen features an expansive 16' x 20' layout, highlighted by a large Calacatta marble island that serves as the central gathering point. Warm cream custom cabinetry and herringbone oak flooring combine to create a sophisticated yet welcoming atmosphere, perfectly suited for both cooking and entertaining.
- Large Calacatta marble island with seating
- Professional stainless steel appliances
- Inset cream-painted cabinetry
- Herringbone oak hardwood flooring
- Brass pendants over the island
Floor Plan
Finish Schedule
| Category | Item | Spec | Qty | Unit |
|---|---|---|---|---|
| Flooring | Engineered Oak Hardwood — Herringbone Pattern | 5in wide plank, natural oak, site-finished; 320 SF net + 15% waste | 373 | SF |
| Flooring | Flooring Adhesive / Nail-Down Fasteners | Urethane adhesive or 16ga cleat nails, per mfr spec | 10 | tubes/boxes |
| Flooring | Hardwood Floor Finish — Polyurethane | Satin sheen, 3-coat system, water-based | 3 | gal |
| Cabinetry — Base | Base Cabinets — Inset, Cream Painted | Custom inset face-frame, soft-close, 34.5in H x 24in D, warm cream finish | 28 | LF |
| Cabinetry — Base | Sink Base Cabinet | 36in W inset, open-back for plumbing, matches base run | 1 | EA |
| Cabinetry — Base | Range Base / Filler Panels | 48in opening with side filler panels, matches base run | 1 | EA |
| Cabinetry — Base | Refrigerator Enclosure — Base & Side Panels | Built-in surround for 48in pro refrigerator, floor-to-ceiling, inset style | 1 | EA |
| Cabinetry — Upper | Upper Cabinets — Inset, Cream Painted | Custom inset face-frame, 42in H x 13in D, soft-close, warm cream | 24 | LF |
| Cabinetry — Upper | Crown Molding — Cabinet Top | Painted poplar, 3.5in profile, mitered corners; perimeter + 15% waste | 52 | LF |
| Cabinetry — Island | Island Base Cabinets — Inset, Cream Painted | Approx 4ft x 8ft island base, inset drawers/doors all sides, toe kick | 1 | EA |
| Cabinetry — Island | Island Overhang Support Brackets — Brass | Heavy-duty decorative brass, for seating overhang | 4 | EA |
| Countertops | Calacatta Marble Slab — Island | Calacatta Oro, 1.5in thick, waterfall ends, honed or polished finish | 40 | SF |
| Countertops | Calacatta Marble Slab — Perimeter | Calacatta Oro, 1.25in thick, eased edge, matching veining to island | 64 | SF |
| Countertops | Marble Sealer | Penetrating stone sealer, apply 2 coats | 2 | qt |
| Appliances | Professional Range — 48in | 48in dual-fuel or all-gas, stainless, 6-burner + griddle, e.g. Wolf or equiv. | 1 | EA |
| Appliances | Range Hood / Ventilation Insert | 54in wide, min 1200 CFM, stainless or custom plaster surround | 1 | EA |
| Appliances | Professional Refrigerator — Built-In Double | 48in wide built-in column or side-by-side, stainless, flush inset | 1 | EA |
| Appliances | Dishwasher | 24in panel-ready, integrated, quiet series | 1 | EA |
| Plumbing | Farmhouse / Undermount Sink — Main | 36in apron-front, fireclay or stainless, centered on far wall | 1 | EA |
| Plumbing | Kitchen Faucet — Main | Pull-down, brass/unlacquered finish, deck-mounted | 1 | EA |
| Plumbing | Pot Filler — Wall Mount | Brass, double-jointed, wall-mount above 48in range | 1 | EA |
| Plumbing | Supply & Drain Rough-In — Kitchen | Hot/cold supply, drain, pot filler stub-out; copper or PEX | 1 | LS |
| Electrical | Recessed Lighting — LED | 4in or 6in gimbal, 90 CRI, 2700K, IC-rated, on dimmer | 12 | EA |
| Electrical | Pendant Lights — Brass Statement | Unlacquered brass, over island, approx 10-12in diameter globe or linear | 3 | EA |
| Electrical | Under-Cabinet LED Strip Lighting | Hardwired LED tape, 2700K, dimmable, with diffuser channel | 24 | LF |
| Electrical | Dedicated Circuits — Appliances | 20A or 50A as req'd: range, refrigerator, dishwasher, microwave, hood, GFCI | 6 | EA |
| Electrical | GFCI Outlets — Countertop | Tamper-resistant GFCI, 20A, within 4ft of sink per NEC | 8 | EA |
| Tile & Backsplash | Backsplash Tile — Slab Marble or Large Format | Matching Calacatta marble slab or 4x12in subway, full height to uppers; +10% waste | 55 | SF |
| Tile & Backsplash | Tile Adhesive / Thinset | White polymer-modified thinset, 50 lb bags | 4 | bags |
| Tile & Backsplash | Grout — Unsanded | White or warm gray, tight joint, 10 lb bags | 2 | bags |
| Painting & Drywall | Drywall Repair / Skim Coat | Patch and level walls/ceiling after rough-in work | 1 | LS |
| Painting & Drywall | Interior Paint — Walls | Premium eggshell, neutral warm white, 2 coats; ~560 SF wall area +10% waste | 4 | gal |
| Painting & Drywall | Interior Paint — Ceiling | Flat white ceiling paint, 2 coats; 320 SF +10% waste | 2 | gal |
| Painting & Drywall | Cabinet Paint / Finish | Factory-applied conversion varnish, warm cream, inset cabinetry | 1 | LS |
| Millwork & Trim | Base Molding | Painted poplar, 4.5in profile; room perimeter + island + 10% waste | 80 | LF |
| Millwork & Trim | Window Casing — Twin Windows | Painted poplar, 3.5in colonial or craftsman profile per window | 2 | EA |
| Millwork & Trim | Hood Surround / Mantle — Custom | Site-built painted MDF/poplar range hood enclosure, decorative corbels | 1 | EA |
| Hardware | Cabinet Hardware — Pulls & Knobs | Unlacquered brass, bin pull or cup pull, inset door/drawer style | 60 | EA |
| Hardware | Soft-Close Hinges — Inset | Blum or equiv., inset face-frame clip-top hinge, soft-close | 80 | EA |
| Hardware | Drawer Slides — Undermount | Blum Tandem or equiv., full-extension, soft-close, 21in | 40 | PR |
| Structural & Miscellaneous | Island Blocking / Subfloor Reinforcement | 2x10 blocking and plywood reinforcement at island anchor points | 1 | LS |
| Structural & Miscellaneous | Ventilation Ductwork — Range Hood | Rigid galv. steel duct, 10in round or equiv., exterior termination with damper | 1 | LS |
| Structural & Miscellaneous | Construction Adhesive & Fasteners | Screws, nails, PL adhesive, shims — general rough and finish | 1 | LS |
Quantities from room dimensions — verify before ordering.
Contractor Notes
- —Pot Filler Rough-In Behind a 48" Range — A brass pot filler on the left wall sounds great, but if that wall is an exterior wall or has no existing plumbing chase nearby, running a dedicated water line to a wall-mounted pot filler requires opening the wall, running supply lines, and potentially cutting through tile after the fact. If this isn't planned and roughed-in before the backsplash and range wall are finished, you're looking at a costly tear-out later. → Confirm the pot filler rough-in is on the plumber's scope BEFORE any tile or drywall work begins on that wall. Add it to the permit drawings now — it's a minor cost at rough-in stage and an expensive retrofit later.
- —Calacatta Marble Island — Structural Load & Subfloor — A large Calacatta marble slab for a 16ft-wide kitchen island is extremely heavy — a 2" thick slab can run 18–25 lbs per square foot. Depending on the floor system below (especially if this is upper-story or over a crawlspace), the subfloor and joists may need to be evaluated for point load capacity. This is frequently overlooked until the island base is already built. → Have a structural engineer or your GC assess the floor joist span and load capacity before committing to a full marble slab. Engineered quartz that mimics Calacatta is 30–40% lighter and significantly cheaper, while being far more durable for a kitchen surface.
- —48" Professional Range Ventilation — CFM & Makeup Air — A 48" pro range typically requires a hood rated at 900–1,200+ CFM. In most jurisdictions, any exhaust system over 400 CFM requires a makeup air system to compensate for depressurization. This is a code requirement (IRC M1503.6) that is almost universally missed in residential kitchen designs and can add $2,000–$6,000 to the HVAC scope depending on the solution. → Confirm with your mechanical contractor whether a makeup air unit is required by your local code before finalizing the hood and vent duct routing. Also verify the duct chase path to the exterior — a 10" round duct needs a clear run and shouldn't be over 20 equivalent feet without upsizing.
- —Twin Windows on Far Wall With Centered Sink — Header Complexity — If these two windows don't already exist, adding or widening them on the far wall requires structural headers in the wall framing. With a 10ft ceiling, those headers need to be sized accordingly. This is often a $3,000–$6,000 structural cost per new window opening that homeowners don't see coming. → If the windows are existing, confirm their rough opening sizes match the design. If they're new or being widened, get a structural detail from your designer or engineer and make sure it's explicitly in the contractor's bid — not a 'we'll figure it out' item.
- —Custom Inset Cabinetry in Warm Cream — Fully custom inset cabinetry is the single most expensive cabinet option available — typically 3–4x the cost of semi-custom. Inset doors require extremely tight tolerances, more shop time, and specialty hinges. In a 16x20ft kitchen, a full custom inset package could easily run $80,000–$120,000+ just in cabinetry. → Semi-custom inset or partial-inset cabinetry from brands like Showplace, Medallion, or KraftMaid's higher lines achieves a nearly identical look at roughly 40–50% of the cost. Most guests and even designers cannot tell the difference once painted and installed. Save the full custom budget for the island or a focal piece.
- —Panel-Ready Professional Refrigerator — Setting a professional stainless refrigerator 'into cabinetry' almost always implies custom cabinet panels on at least the sides and potentially a custom surround or grill. Each appliance panel runs $200–$800, and a built-in surround for a pro-style fridge can add $1,500–$3,000 in millwork. → If you're using a counter-depth or built-in refrigerator model (e.g., Sub-Zero, Monogram, Thermador), confirm upfront whether it's a panel-ready or stainless model — the cabinetry framing dimensions are different. Locking this in early prevents expensive cabinet revisions later.
- —Statement Brass Pendants Over the Island — Designer or custom brass pendants for a large island can run $800–$2,500+ each, and you'll likely need 3–4 over a grand island in this space. That's potentially $5,000–$10,000 in lighting alone for a single fixture run. → Visual House, Rejuvenation, and CB2 all carry solid brass or brass-finished pendants in the $150–$400 range that photograph identically to designer pieces. Allocate the savings to the marble or appliances where quality is actually tactile.
- —Calacatta Marble Slab — Material & Fabrication Cost — Calacatta marble (not to be confused with Carrara) is among the most expensive natural stones available — $150–$250+ per square foot installed. For a grand center island in a 16x20ft kitchen, you could be looking at a slab that runs $8,000–$20,000+ depending on size, thickness, veining match, and edge profile. Marble is also porous and etches easily with acidic foods — a real liability on a kitchen island used for food prep. → Calacatta-look quartz (Silestone, Cambria, Dekton) runs $70–$120/sq ft installed, is non-porous, and is virtually indistinguishable in photos. If authentic marble is a must, consider using it on the island top only and running quartz on the perimeter counters — this cuts material cost by 60–70% while preserving the visual statement.
- —48" Pro Range — Appliance + Installation Cost — A 48" professional range (Wolf, Viking, Thermador, BlueStar) runs $8,000–$18,000 for the unit alone. Add a code-compliant pro hood ($1,500–$5,000), duct work, gas line upgrade (if needed), and makeup air system, and this single line item can reach $20,000–$30,000 all-in. It is the single largest cost driver in this kitchen after cabinetry. → If budget is a concern, a 36" pro range saves $3,000–$6,000 on the unit and reduces hood and duct sizing requirements. Alternatively, a 48" dual-fuel range from a Tier-2 brand (Zline, Forno, Cosmo) delivers a nearly identical visual and functional result at $2,500–$5,000 — a fraction of the Tier-1 price.
- —Herringbone Oak Hardwood Floor — Labor Premium — Herringbone pattern installation costs 30–50% more in labor than straight-lay flooring due to the complex angle cuts, waste factor (15–20% more material needed), and additional layout time. In a 320 sq ft kitchen, that labor premium can add $1,500–$3,000 over a standard plank installation. → If herringbone is a priority, consider limiting it to the main kitchen floor area and using straight-lay in the pantry or adjacent hallway to reduce waste. Alternatively, a large-format straight-lay oak plank in a wide width (5"–7") reads as equally high-end and installs at standard labor rates.
- —10-Foot Ceiling + Custom Cabinet Height — With 10ft ceilings, standard 84" (7ft) stock cabinets will leave a roughly 2ft gap to the ceiling — which you'll almost certainly want to fill with either a second stacked cabinet or extended doors. Either option pushes you out of stock cabinet territory into custom or semi-custom sizing, which is where the budget accelerates quickly. → Specify 96" upper cabinets (available in semi-custom lines) with a simple crown molding detail to bridge the remaining gap to the ceiling. This is significantly cheaper than full floor-to-ceiling custom doors and creates a clean, high-end look. Get your cabinet vendor to confirm 96" availability before the design is locked.
Design Review
- CohesionStainless steel appliances clash with brass fixture palette — The professional stainless steel range and double refrigerator are working against the warm brass metal family established by the pendant lights and pot filler. In the render, the cool silver of the fridge in particular reads as a jarring interruption against the warm cream cabinetry and brass accents. This is the single most disruptive finish conflict in the space. → Swap to panel-ready appliances (refrigerator especially) to hide the stainless behind cabinetry panels. For the range, consider a brass-trimmed or custom-color professional range (e.g., La Cornue or Lacanche in cream or bespoke finish) or at minimum ensure all knobs and trim are in a champagne/brushed gold finish. If stainless must stay, commit to unlacquered brass exclusively nowhere else — the mixing only reads intentional when it is consistent.
- CohesionSink faucet finish appears to be chrome or brushed nickel, not brass — In the render, the main sink faucet at the far wall reads as a cooler silver-toned metal, directly conflicting with the warm brass pendants, pot filler, and visible cabinet hardware. With brass established as the hero metal in this kitchen, a single silver faucet at eye level — centered between the twin windows — will read as an afterthought or oversight. → Replace with an unlacquered brass or brushed brass bridge faucet or deck-mount faucet to complete the metal family. Waterworks, Kallista, or Rohl all offer appropriate options in a traditional profile that would suit the inset cabinet aesthetic.
- CohesionCabinet hardware finish appears inconsistent across zones — The render shows what appears to be small bin-pull or bar-pull hardware on the perimeter lower cabinets, but the upper cabinets are largely bare or using very small knobs. At this scale (16x20 with 10ft ceilings and grand proportions), undersized or inconsistent hardware reads as an unfinished decision rather than restraint. → Standardize on one brass hardware profile throughout — recommend a substantial unlacquered brass cup pull on lower drawers and a matching bin pull or knob on uppers. Hardware should be sized up given the grand cabinet proportions: 4–5 inch pulls on drawers, 1.25 inch knobs minimum on doors.
- ProportionIsland pendants are correctly spaced but hanging height appears too low relative to 10ft ceiling — In the render, the two brass dome pendants hang at what appears to be approximately 6.5–7ft from floor to bottom of shade — which in isolation isn't wrong, but in a 10ft ceiling kitchen this creates an awkward dead zone of empty ceiling above the pendants. The visual weight of the pendants feels compressed rather than dramatic, which is a missed opportunity in a grand chef's kitchen of these proportions. → Raise the pendant canopy drop so the bottom of the shade sits at 36–38 inches above the island countertop surface (standard is 30–36 inches, but given 10ft ceilings, push to the taller end). This elongates the cord/stem visually and creates a more commanding statement. Also consider sizing up — the dome diameter in the render looks to be approximately 14–16 inches; for an island of this scale, 18–20 inch diameter domes would better anchor the space.
- ProportionOnly two barstools shown for island — likely undersized seating for a grand 16x20 kitchen island — The render shows two round stools at the island, and while the island's depth is not fully clear, in a 16ft wide room a properly proportioned island should accommodate 3–4 seats minimum. Two stools on what appears to be a generous island reads as sparse and will feel under-utilized, particularly for a 'grand chef's kitchen' program. → Confirm island dimensions — if the seating side is 60 inches or more, add a third stool. Each stool should be spaced 26–28 inches on center. The current round backless stools are appropriately scaled but would benefit from a slight increase in seat diameter (currently appear ~15 inches; move to 17–18 inches) to feel more generous against the marble island mass.
- ProportionRange hood scale relative to 48-inch range and 10ft ceiling may be insufficient — The render shows a decorative painted wood hood (plaster or MDF construction) over the range. While the hood is attractive and appropriately styled, the visual mass of the hood appears to terminate approximately 6.5–7ft up the wall, leaving significant empty wall between hood top and the 10ft ceiling. On a 48-inch professional range, the hood should command the full vertical wall zone. → Extend the hood chimney or decorative surround to within 12 inches of the ceiling to fill the vertical wall plane. This is common in kitchens with ceilings above 9ft and makes the range wall feel intentional rather than undersized. Add a small crown molding cap at the top to integrate with the perimeter crown.
- MissingNo under-cabinet task lighting visible — The render shows a beautiful cream inset cabinet run along the perimeter, but there is no visible under-cabinet lighting on the far wall or side walls. In a kitchen with a warm cream palette and marble counters, the absence of under-cabinet lighting will make the countertop work zones feel dim and cave-like, especially in the evening. This is one of the most impactful omissions in kitchen lighting plans. → Specify a continuous LED strip or puck lighting run beneath all upper wall cabinets, hardwired and on a dimmer. Use 2700K color temperature to complement the warm brass and cream palette. Recess into the cabinet underside behind a small valance strip to keep the source hidden — this is non-negotiable at this finish level.
- MissingNo perimeter or ambient ceiling lighting plan beyond pendants — The two island pendants are the only visible light sources in the render. In a 16x20 foot kitchen, pendants alone — even large ones — will not provide adequate ambient light for the perimeter counters, the range zone, or the refrigerator alcove. The ceiling is currently bare. → Add a grid of recessed can lights (4-inch aperture, preferred for a refined look at this level) on a separate dimmer circuit. Minimum 6–8 cans for this footprint, positioned to wash perimeter counters. Additionally, consider a decorative ceiling medallion or flush flush-mount at the ceiling center if no additional pendants are planned — the 10ft ceiling currently reads as underaddressed above the island.
- MissingGrout color for backsplash tile is undecided or defaulted to white — The backsplash in the render appears to be a cream or white subway tile with what looks like a white or near-white grout. While safe, this is a missed design decision — in a warm cream and brass kitchen, a warm putty or greige grout would visually ground the tile and prevent the grout lines from disappearing entirely or, worse, reading as stark white against the warmer cabinetry tones over time. → Specify a warm greige sanded grout (e.g., Mapei Warm Gray or Bostik Sandstone) that reads 1–2 shades warmer and darker than the tile body. This gives the backsplash texture and definition without introducing a contrasting color. Avoid bright white — it will clash with the aged brass fixtures as they patina.
- MissingNo window treatment decision for twin sink windows — The twin windows above the sink are shown completely bare in the render. While natural light is the goal, bare windows in a kitchen above a sink create privacy concerns (if ground-floor), glare on the marble island surface, and an unfinished visual top edge to the most prominent wall in the kitchen. → Specify a simple woven wood shade or a narrow Roman shade in a natural linen mounted inside the window frame. Keep it simple — this is a working kitchen wall, not a focal drapery moment — but the window needs a top treatment that addresses morning glare on the Calacatta island and provides privacy without blocking light. Mount inside the casing to preserve the architectural window detail.
- MissingNo decision on herringbone floor border or transition material at room entry — Herringbone oak floors are specified, but the render does not show how the herringbone pattern terminates at the kitchen entry or how it transitions to adjacent rooms. Herringbone without a deliberate border or transition strip will have an awkward cut-off edge that reads as unfinished, particularly in a grand kitchen renovation at this level. → Add a straight-laid oak border (2–3 inch band in the same or slightly contrasting oak species) around the perimeter of the herringbone field. At doorway transitions, use a brass threshold strip to echo the brass metal family and create a clean visual stop. Confirm the herringbone is centered on the room axis — ideally aligned with the island center — before installation begins.
Generated by Sightline · July 18, 2026 · Planning reference only · Verify all dimensions in field sightline
Like this kitchen? Make it yours — change materials, layout, style.Keep designing this room →