Renovation Specification · Sightline
Bathroom
9′ × 11′ · July 18, 2026
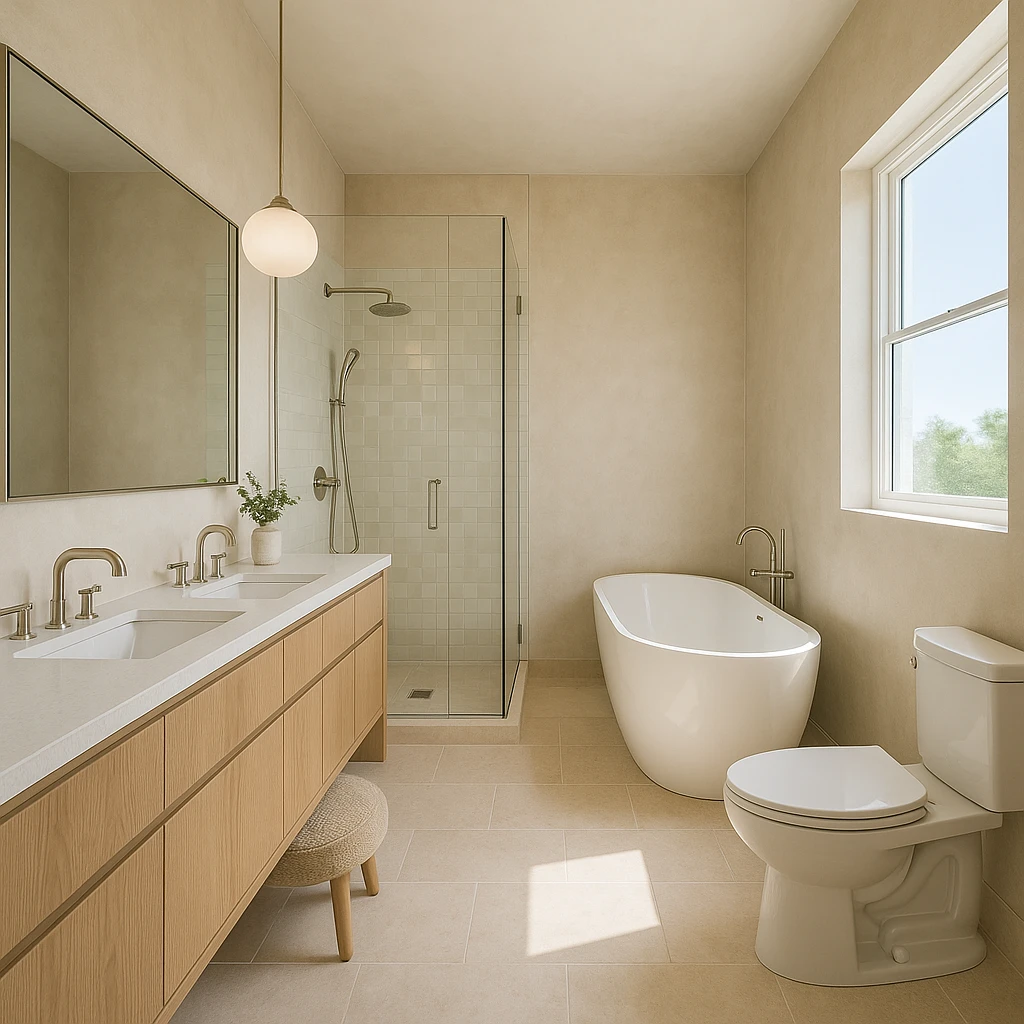
The Design
Serene spa-inspired primary bathroom retreat
This primary bathroom combines tranquility with modern luxury. Featuring a frameless glass walk-in shower and a white freestanding soaking tub, the layout emphasizes function and elegance. Warm plaster walls and large-format limestone tiles create a soothing atmosphere, enhanced by brushed nickel fixtures throughout.
- Frameless glass walk-in shower with zellige tile
- White freestanding soaking tub
- Long white-oak double vanity with mirrors
- Large-format limestone floor tiles
- Brushed nickel fixtures and finishes
- Natural light from window on right wall
Floor Plan
Finish Schedule
| Category | Item | Spec | Qty | Unit |
|---|---|---|---|---|
| Demolition & Prep | Demo & disposal — existing bathroom fixtures, tile, drywall | full gut to studs and subfloor | 1 | lot |
| Demolition & Prep | Cement backer board — shower walls | 1/2in HardieBacker, shower enclosure | 80 | SF |
| Demolition & Prep | Schluter Kerdi waterproofing membrane — shower | full shower wall and floor coverage | 80 | SF |
| Flooring | Large-format limestone floor tile | 24x24in honed limestone, includes 13% waste (99 SF net) | 112 | SF |
| Flooring | Uncoupling membrane — floor | Schluter Ditra, full floor field | 99 | SF |
| Flooring | Porcelain mosaic tile — shower floor | 2x2in white mosaic, slip-resistant, 15% waste factor | 15 | SF |
| Tile — Shower | Zellige wall tile — shower enclosure | 4x4in handmade zellige, full height to 9ft, 15% waste factor | 92 | SF |
| Tile — Shower | Schluter Jolly trim profile — shower tile edges | brushed nickel, 1/2in reveal | 36 | LF |
| Tile — Shower | Large-format porcelain shower niche | 12x24in recessed niche, brushed nickel frame | 1 | EA |
| Tile Setting Materials | White polymer-modified thinset mortar | 50 lb bags, for zellige and limestone | 10 | bags |
| Tile Setting Materials | Unsanded grout — shower walls | 10 lb bags, white, tight joints for zellige | 4 | bags |
| Tile Setting Materials | Sanded grout — floor and shower floor | 25 lb bags, warm white, 1/8in joint | 4 | bags |
| Walls & Ceiling | Venetian/warm plaster finish — walls | 2-coat trowel-applied plaster, exclude shower and vanity wall | 380 | SF |
| Walls & Ceiling | Moisture-resistant drywall — ceiling | 1/2in MR drywall, 9ft ceiling | 99 | SF |
| Walls & Ceiling | Primer + ceiling paint | semi-gloss white, includes 10% waste | 2 | gal |
| Shower Enclosure | Frameless glass shower enclosure | 3/8in tempered glass, brushed nickel hardware, corner layout | 1 | EA |
| Shower Enclosure | Schluter linear drain — shower | 32in, brushed nickel grate | 1 | EA |
| Plumbing — Fixtures | Freestanding soaking tub | 60x30in oval, white acrylic or cast iron | 1 | EA |
| Plumbing — Fixtures | Freestanding tub filler faucet | floor-mount, brushed nickel, with hand shower | 1 | EA |
| Plumbing — Fixtures | Thermostatic shower system | brushed nickel, dual-function valve, rain head + hand wand | 1 | EA |
| Plumbing — Fixtures | Rain shower head — ceiling mount | 12in, brushed nickel | 1 | EA |
| Plumbing — Fixtures | Handheld shower wand + slide bar | brushed nickel, 60in hose | 1 | EA |
| Plumbing — Fixtures | Undermount bathroom sink | rectangular undermount, white ceramic, 16x11in | 2 | EA |
| Plumbing — Fixtures | Single-hole faucet — vanity | brushed nickel, 8in spout reach | 2 | EA |
| Plumbing — Fixtures | Toilet | elongated comfort height, dual-flush, white | 1 | EA |
| Plumbing — Rough | Supply and drain rough-in — vanity sinks | 1/2in supply lines, P-trap per sink | 2 | EA |
| Plumbing — Rough | Supply and drain rough-in — tub | 1/2in hot/cold, 1.5in drain | 1 | EA |
| Plumbing — Rough | Supply and drain rough-in — shower | 1/2in hot/cold, 2in drain to linear | 1 | EA |
| Vanity & Millwork | White oak double vanity cabinet | 84in W x 22in D x 34in H, custom or semi-custom, white oak | 1 | EA |
| Vanity & Millwork | Vanity countertop — honed stone or quartz | 84x22in, honed white quartz or limestone, with 2 sink cutouts | 16 | SF |
| Vanity & Millwork | Wall-length mirror | 84in W x 42in H, frameless, wall-mount | 1 | EA |
| Vanity & Millwork | Vanity drawer pulls / hardware | brushed nickel bar pull, 5in | 12 | EA |
| Electrical | Vanity sconce or LED strip light | brushed nickel, 2700K, above or beside mirror | 2 | EA |
| Electrical | Recessed ceiling lights | 4in LED gimbal, 2700K, damp-rated | 6 | EA |
| Electrical | Exhaust fan | 110 CFM, humidity-sensing, damp-rated | 1 | EA |
| Electrical | GFCI outlets | 15A, tamper-resistant, near vanity | 2 | EA |
| Electrical | In-floor radiant heat mat — floor | 120V electric mat, thermostat included | 99 | SF |
| Accessories & Hardware | Towel bar | 24in, brushed nickel, wall-mount | 2 | EA |
| Accessories & Hardware | Toilet paper holder | brushed nickel, wall-mount | 1 | EA |
| Accessories & Hardware | Robe hook | brushed nickel, double hook | 2 | EA |
| Accessories & Hardware | Shower shelf / corner caddy | built-in tiled niche, brushed nickel shelf insert | 1 | EA |
| Doors & Windows | Bathroom entry door — solid core | 32x80in, pre-hung, painted white, privacy lockset | 1 | EA |
| Doors & Windows | Window — obscure glazing | existing R/O assumed, frosted tempered glass, brushed nickel hardware | 1 | EA |
Quantities from room dimensions — verify before ordering.
Contractor Notes
- —Zellige tile in a shower enclosure — waterproofing and installation complexity — Zellige is a handmade, highly porous Moroccan clay tile with an uneven surface and inconsistent thickness. In a wet shower environment, it must be sealed aggressively and re-sealed regularly or it will stain and absorb moisture behind the glaze. The uneven face also makes waterproofing the substrate more critical — any membrane gaps behind irregular tile in a shower will eventually lead to water intrusion. Many tile setters upcharge 30–50% for zellige due to the extra labor in back-buttering and leveling each piece. → Confirm your tile installer has specific zellige shower experience. Budget for a penetrating sealer applied before and after grouting, and plan for annual re-sealing. If this is a concern, a glazed ceramic zellige-look tile (e.g., Cle or Fireclay lookalikes) gives a nearly identical aesthetic at a fraction of the cost and maintenance.
- —Freestanding soaking tub requires a floor-mount filler — plumbing rough-in must be planned now — A freestanding tub in the far-right corner needs a floor-mounted or freestanding tub filler. The supply lines must come up through the subfloor in a very specific location relative to the tub's final placement. If the rough-in is done before the tub is on-site and confirmed, the filler will be off-center or unreachable. This is one of the most common and expensive mid-project corrections in bathroom renovations. → Have the actual tub on-site or at minimum confirmed with exact specs (tub length, drain location, filler rough-in position) before your plumber does the rough-in. Do not let the plumber estimate the location.
- —Large-format limestone floor tile — significant subfloor flatness and deflection requirement — Limestone is a natural stone that is brittle and unforgiving. Large-format stone tiles (likely 24x24 or larger given the design aesthetic) require an exceptionally flat subfloor (no more than 1/8" variation in 10 feet per TCNA guidelines) and a very stiff, low-deflection subfloor assembly. If the subfloor flexes even slightly, limestone will crack — and it's very difficult to replace a single tile without disturbing the whole field. On a wood-framed floor, this often means adding a layer of Schluter Ditra or a self-leveling underlayment, which adds cost. → Have your tile installer assess subfloor flatness and deflection before tile is ordered. Budget for self-leveling compound or an uncoupling membrane. Also note that limestone requires sealing before and after grout, similar to zellige — factor in ongoing maintenance.
- —Window on the right wall adjacent to the toilet — GFCI and privacy worth confirming — A window near the toilet and adjacent to the freestanding tub means any outlets or switches within 6 feet of the tub or other water sources must be GFCI-protected — standard for bathrooms, but worth explicitly calling out to your electrician given the number of water sources in this room. Separately, a window in this location should be obscured glass or placed high on the wall for privacy, which isn't always the default assumption contractors make. → Specify obscured or frosted glass on the window if it faces any neighboring sightlines. Confirm with your electrician that all outlets are GFCI-protected, especially near the tub and vanity.
- —White oak double vanity — likely custom or semi-custom at this wall length — A 'long' double vanity along an 11-foot wall is almost certainly not a stock cabinet run. Custom vanity cabinetry in white oak with a furniture-grade finish can run $8,000–$20,000+. Even semi-custom can be $4,000–$10,000 depending on length and finish. → Price out a semi-custom vanity from IKEA SEKTION (with a custom white oak veneer face from a company like Semihandmade) or RH-style vanity lookalikes from brands like Strasser or Foremost. A 72" double vanity plus a filler panel and matching open shelf can achieve the same built-in look for 40–60% less than true custom. Also confirm the exact wall length — if it's under 84", stock cabinet heights apply; over that, you're in custom territory.
- —Wall-length mirror — custom cut vs. standard panels — A single wall-length mirror spanning the full vanity wall is almost always a custom cut piece of glass, which requires professional installation, is fragile to ship, and adds significant cost. A single large mirror over a 72"+ vanity can cost $500–$2,000+ just for the glass. → Two or three frameless mirror panels butted together, or a pair of matching framed mirrors, achieve a nearly identical look and use stock sizes. Polished-edge mirror panels from a local glass shop in 36" or 48" widths are much more affordable and easier to replace if one is ever damaged.
- —Brushed nickel fixtures across all elements — coordination risk — With multiple fixture sources (shower fixtures, tub filler, vanity faucets, toilet hardware, towel bars), brushed nickel can vary significantly in tone between manufacturers — some are warm, some are cool, some are more silver. This is a very common source of disappointment in finished bathrooms. → Specify all fixtures from one or two manufacturers maximum (e.g., Kohler, Moen, or Delta all have coordinated brushed nickel lines). Alternatively, consider unlacquered brass or matte black — both have more consistent color across brands and are currently just as available at similar price points.
- —Zellige tile — the single largest cost variable in this design — Authentic zellige tile runs $30–$60+ per square foot for material alone, before the labor upcharge. In a full shower surround (walls + floor of the shower), you're easily looking at 80–120 sq ft, putting material cost alone at $2,400–$7,200. Combined with the 30–50% labor premium, the shower tile package could represent $5,000–$12,000+ of your budget depending on shower size. → If the zellige is a non-negotiable aesthetic anchor, keep it to one feature wall or the shower niche and use a complementary solid tile (a matte white or warm cream ceramic) on the remaining shower walls. This can cut the zellige material cost by 60–70% while preserving the visual impact.
- —Freestanding tub — material and plumbing cost combined — A quality freestanding soaking tub runs $1,500–$6,000+ depending on material (acrylic vs. cast iron vs. stone resin). Stone resin tubs, which fit this design aesthetic best, start around $2,500 and go well beyond $5,000. Add a floor-mount filler at $400–$1,500, plus the plumbing rough-in, and the tub package is easily $4,000–$8,000 installed. → If budget is tight, an acrylic freestanding tub in a matte white finish (e.g., from Kohler, American Standard, or MAAX) is visually indistinguishable in a finished photo and starts around $800–$1,500. Reserve the stone resin upgrade for future if needed.
- —Large-format limestone floor — material, prep, and labor all premium — Limestone tile at large format is expensive on three fronts: the stone itself ($10–$25/sq ft), the installation labor premium for large-format tile, and the subfloor prep likely required. In a 9x11 bathroom (~99 sq ft), you're looking at $1,000–$2,500 just in tile material, plus $1,500–$3,000 in labor and prep. Limestone also requires periodic sealing as an ongoing ownership cost. → A large-format porcelain tile in a limestone or warm travertine look (e.g., from Emser, MSI, or Marazzi) costs $3–$8/sq ft, installs the same way, never needs sealing, and is nearly indistinguishable from 5 feet away. Reserving real limestone for just the shower floor or a small accent area captures the material authenticity where it's most noticed.
- —9-foot ceilings with a full-height frameless glass shower enclosure — Frameless glass panels cut to 9-foot height are non-standard. Standard frameless glass shower doors and panels are typically cut to 72"–80" height. Going to a true 9-foot ceiling height in glass means custom-cut panels, thicker glass for structural stability (likely 3/8" or 1/2"), and custom hardware — all of which add cost. A full 9-foot frameless enclosure can run $4,000–$10,000+ just for the glass and hardware. → Consider a frameless shower with panels at standard 80" height and leaving the upper portion open (a common high-end design choice that also improves ventilation). This uses stock glass sizes and dramatically reduces cost while maintaining the open, airy aesthetic. Alternatively, a 3/4-height fixed panel with a ceiling-mounted linear drain design is a popular workaround.
Design Review
- CohesionBrushed Nickel vs. Warm Material Palette Tension — The brushed nickel fixtures — visible on the vanity faucets, shower system, and tub filler — read as cool-toned silver against an otherwise entirely warm palette (white oak, warm plaster, creamy limestone, zellige). Brushed nickel has a grey-silver undertone that subtly fights the honey and sand tones surrounding it. → Swap to brushed brass or unlacquered brass throughout. It will anchor the warmth of the white oak cabinetry and plaster walls, creating a cohesive warm-organic aesthetic rather than a split warm/cool one. Every fixture — faucets, shower, tub filler, door pulls, and shower door frame — must be in the same finish.
- CohesionShower Door Frame Finish Inconsistency — The frameless glass shower enclosure appears to have a dark or black-toned door frame and handle, which reads as a jarring hard edge against the soft sand-and-cream palette. This introduces an unintended industrial accent that competes with the serene, organic aesthetic. → Specify the shower door hardware — pull handle, hinges, and any framing channel — in the same brushed brass (or chosen metal finish) as the plumbing fixtures. A true frameless glass enclosure with minimal matte brass hardware would dissolve into the space rather than punctuate it.
- CohesionZellige Tile Scale and Color vs. Room Palette — The zellige tile in the shower reads as small-format and relatively uniform in color — appearing as a flat sage-green or grey-green in the render. While zellige is a strong textural choice, this particular colorway introduces a cool green note that doesn't directly connect to the warm limestone, plaster, or oak tones elsewhere in the room. → Source zellige in a warm off-white, cream, or sandy terracotta tone to stay within the warm neutral family. Clé Tile and Cle's 'Plaster' or 'Butter' colorways, or a warm white from Mosaic House, would maintain the handmade texture while keeping the palette unified.
- CohesionToilet Finish Out of Family — The toilet is a standard bright-white vitreous china with a conventional two-piece silhouette. Against the warm plaster walls and tonal beige-cream palette, the stark white reads as a clinical interruption — especially positioned so prominently near the camera foreground on the right wall. → Specify a one-piece or wall-hung toilet with a softer, more minimal silhouette. While you cannot change the porcelain color, a wall-hung model (e.g., TOTO or Duravit) would reduce its visual footprint significantly and align better with the clean, considered aesthetic of the rest of the design.
- ProportionPendant Light Too Small and Poorly Positioned for Vanity Task Lighting — A single globe pendant is centered in the space, hanging mid-room rather than over the vanity where task lighting is needed. At the scale visible in the render, the globe reads as undersized for a 9ft ceiling and a long double vanity — it appears decorative but functionally orphaned, illuminating neither the mirror zone nor the tub effectively. → Relocate pendant lighting — or add two pendants — flanking or directly above the vanity mirror zone, hung at approximately 78–80 inches from finished floor to bottom of globe. Supplement with a dedicated light source above or within the mirror (integrated LED strip or sconce pair) for proper face-level task lighting. A single centered pendant in an 11ft-deep room is both functionally and proportionally insufficient.
- ProportionMirror Height Relative to 9ft Ceiling Feels Compressed — The wall-length mirror appears to stop well short of the ceiling, with significant bare plaster wall visible above it. On a 9ft ceiling, this gap makes the mirror — and the entire vanity wall — feel squat and unfinished, as though the design ran out of momentum vertically. → Extend the mirror to within 6–8 inches of the ceiling line, or take it full height to the ceiling. At minimum, the mirror top should align with the top of the shower enclosure or door height to create a consistent horizontal datum across the left wall. A taller mirror also dramatically amplifies light from the right-wall window.
- ProportionFreestanding Tub Scale Relative to Its Wall Pocket — The freestanding soaking tub is positioned in the far-right corner but the surrounding floor area — particularly between the tub and the toilet — appears tight. In a 9ft-wide room with the vanity consuming the full left wall, the tub's placement near the toilet leaves what looks like less than 18 inches of clearance between the two fixtures, which is below comfortable code and ergonomic minimums. → Verify the tub-to-toilet clearance is no less than 18 inches (ideally 24 inches). If tight, consider a slightly smaller tub footprint — many soaking tubs come in 55-inch versions versus the standard 59–67 inch lengths — or shift the toilet position toward the camera wall to create breathing room around the tub.
- ProportionFloor Tile Format Too Small for the Room — The limestone floor tile appears to be approximately 12x24 or 18x18 in the render. For a 9x11ft bathroom with 9ft ceilings and a deliberately minimal, spa-like aesthetic, this format reads as slightly busy and residential rather than elevated. The grout lines are frequent enough to visually chop the floor plane. → Upsize to a 24x48 or 30x60 format large-format limestone slab tile. Fewer grout lines will make the floor feel more expansive, cleaner, and more in line with the high-end spa aesthetic the design is targeting. Lay in a staggered 1/3 offset, not a 50/50 brick pattern, to avoid lippage with large format stone.
- MissingGrout Color Unspecified — High Risk of Undermining the Palette — No grout color has been called out for either the floor limestone tile or the zellige shower tile. This is one of the highest-impact decisions in the room. A white or grey grout on the floor will create a grid that fights the seamless warmth the design is going for. A mismatched grout in the zellige will flatten its handmade quality. → Specify a warm putty or sand-toned unsanded grout for the floor tile (e.g., Laticrete 'Antique White' or Custom Building Products 'Haystack'). For the zellige shower tile, use a tone-on-tone grout that matches the tile body color closely — this preserves the undulating handmade surface texture as the visual feature, not the grid.
- MissingNo Lighting Plan Beyond the Single Pendant — The render shows one pendant light as the only visible light source. There is no vanity task lighting, no shower interior lighting, no toe-kick or accent lighting under the floating vanity, and no specification for how the space functions after dark or on overcast days despite having only one window. → Develop a layered lighting plan with four zones: (1) Vanity task lighting — integrated LED strip behind a lit mirror or two wall sconces at face height; (2) Ambient — recessed downlights on a dimmer, ideally in a warm 2700K color temperature; (3) Shower — a wet-rated recessed fixture inside the shower enclosure; (4) Accent — LED toe-kick strip under the vanity to add depth and make the floating cabinet read correctly at night.
- MissingWindow Treatment or Privacy Solution Unaddressed — The right-wall window provides natural light and a view, but no privacy treatment has been specified. In a primary bathroom, this is a functional and code-relevant omission, particularly if the window faces neighbors or a street. → Specify a top-down/bottom-up cellular shade or a woven wood shade in a natural fiber (jute, bamboo) that can be raised from the bottom for light while maintaining privacy. Avoid heavy drapery — it will absorb moisture. The shade should be mounted inside the window frame to keep the plaster wall plane clean.
- MissingNo Towel Storage or Warming Solution Specified — The design shows no towel bars, hooks, heated towel rails, or built-in niches. In an 11ft deep room with a freestanding tub, reaching for a towel post-bath is a real functional issue. The vanity stool is the only accessory visible, and it does not solve this. → Add a floor-mounted brushed brass heated towel rail between the tub and the toilet wall, or a simple robe hook pair on the plaster wall adjacent to the shower entry. Also spec a recessed niche inside the shower for products — a zellige-tiled niche would be a beautiful detail that also solves functional storage.
- MissingVanity Cabinet Hardware Not Specified — The white oak vanity drawers and doors appear to have no visible pulls or hardware in the render. Whether this is an intentional push-to-open design or an oversight, it is unresolved — and if push-to-open, the mechanism type and quality needs to be specified. → If adding hardware, select a slim bar pull or a small knob in brushed brass, scaled to the drawer size — a 96mm or 128mm bar pull on the larger drawers, a small 30mm knob on upper drawers. If going push-to-open (touch-latch), specify Blum Tip-On mechanisms and confirm the cabinetmaker is building for it — it is not an afterthought detail.
Generated by Sightline · July 18, 2026 · Planning reference only · Verify all dimensions in field sightline
Like this bathroom? Make it yours — change materials, layout, style.Keep designing this room →